
Year 5 Sphero Programming Activity Pack
Progression of skills in this pack:
1. Understanding Bluetooth Technology as Input Device
2. Write programs for the Sphero using movement and repetition (loops).
3. Write a program to trace a maze/route with Sphero and De-bug.
4. Write a program with outputs.
5. Write a program with random variables
📝 National Curriculum Content
Design, write and debug programs that accomplish specific goals, including controlling or simulating physical systems; solve problems by decomposing them into smaller parts.
Use sequence, selection, and repetition in programs; work with variables and various forms of input and output.
Use logical reasoning to explain how some simple algorithms work and to detect and correct errors in algorithms and programs.
Introduction
On many occasions in Primary Computing, the pupils are using programming language that is controlling on-screen objects such as Scratch, Kodu, Hopscotch etc. However, it also important that children write programs to control physical devices to make connection between digital and physical objects. Sphero is a bluetooth wireless ball that can be programmed from an iPad or Android device using various different apps. This unit or parts of it can be taught right across Key Stage 1 and 2 but the programming aspect of it (Lesson 2 onwards) is best for Key Stage 2. It requires Spheros and iPads/Android/Chromebook devices with the Sphero Edu app so dependent on how many Spheros and iPads you have will determine how you teach it. For example, it could be taught as a Code Club activity if equipment is limited.
What will you need?
iPad/Android/Chromebook devices with Sphero Edu app.
Sphero 2.0 or Sphero Sprk+ or Sphero Mini (multiple Spheros if possible)
Floor space
Coloured paper and sticky tape
Assessment
The video above includes a demonstration of how the teachers can set up the Lightning Lab app to use with pupils. There is also a guide to this here.
Cross curriculur opportunities
Numeracy
2D Shapes – Lesson 2 and 3 of this unit look at writing a program to draw/move sphere around 2D shapes such as squares and rectangles.
Angles – When the Sphero is being programmed to move, its direction is determined by the angle in which it is set at.
Literacy
Lesson 4 of this unit introduces outputs where the device will speak and the pupils can tell a story as the Sphero moves from place to place.
Design
Pupils can design paper covers for the Sphero based around different themes or linked to storytelling in lesson 4.
Science (friction)
Lesson 2 talks about moving the Sphero by programming how long in seconds the Sphero will move forward for. A simple science experiment could be set up where the Sphero moves for the same length of time on different surfaces and distances could then be measured.
Science (Planets) or Geography Map
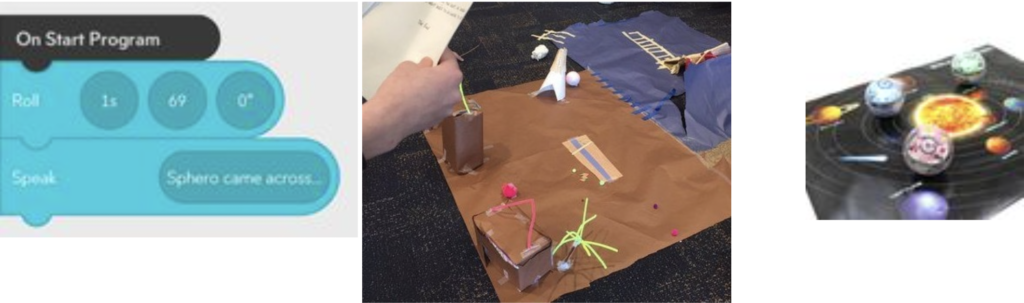
Lesson 4 also has example of the Sphero visiting different planets on a poster and saying facts about them.
Lesson 1: Introduction to Sphero and Understanding Bluetooth Technology as Input Device
Teacher Input
The first think to look at is connecting the Sphero to the iPad/tablet using Bluetooth, explaining that bluetooth is the computer in the tablet talking to the Sphero with a wireless signal. This article explains how to connect your device to a Sphero.
The pupils could think of other examples of where Bluetooth is used (send files from one device to another, bluetooth speakers and headphones etc) Demonstrate how to connect the Sphero to the iPad (see video below) and use the controls to move it around, using the iPad or device as an input. Dependent on the size of your room, you may want to put some sort of soft bumpers on the walls or if you are outside you could use the off-road bumper.
Pupil tasks
1. The pupils could connect their Sphero to their iPad using Bluetooth and then open the Lightning Lab app to find the Sphero.
2. Use the controls to calibrate the Sphero to the correct position and then move it around.
3. Use the drawing tool to draw a route that Sphero will take.
Directing and using draw tool video tutorial.
Lesson 2: Write programs for the Sphero using movement and repetition (loops) with code blocks
Teacher Input
Demonstrate the block coding tool in Lightning Lab app (see video tutorials below) and how to use the ‘Program’ section to write a program to move the Sphero backwards and forwards before shapes such as squares. Then the repetition code could be use to loop the shape multiple times.
Pupil task 1
Pupils write programs for movement and shape routes before experimenting to move the Sphero around for other routes of other shapes such as rectangles, triangles and circles .
Basic movement programming video tutorial.
Program a square movement video tutorial.

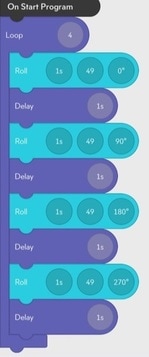
Pupil Task 2
Use the loop code block in the Control section at the bottom of the screen to put all of a shape code into a a loop. See screenshot.
Lesson 3: Write a program to trace a maze/route with Sphero and De-bug
Teacher Input
Demonstrate to the pupils that they are now going to use their programming skills to program a route for sphere to travel around a maze. Either the teacher or pupils can design a maze on the floor using paper and stick tape or coloured sticky tape.
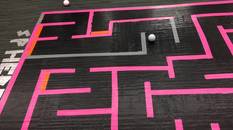
Pupil Tasks
Pupils can write a program to move their Sphero around a maze in one go, debugging (correcting errors) in their program if the Sphero goes wrong. The Spheros also come with ramps which could be part of the made to make it more interesting.
Another task could be to write a program so that the Sphero stays on the lines of a shape.
Lesson 4: Write a program with outputs (storytelling and facts)
Teacher Input
The pupils are then going to use the actions code blocks section to add a Speak or Play Sound. Demonstrate how the Speak code block can be added to a program, text added and when the program is executed the iPad or device will speak the text (make sure the device’s volume is turned up. The Sphero also has a light output (Set Colour) which can be set at different points of the program.

Pupil Tasks
There are a few nice opportunities for using the speak and sound outputs. One activity is for the pupils to make a story where the Sphero visits different places/characters and a story is told. Also, a poster of planets or map could be used and as the Sphero reaches the places, facts are added.
Teacher Input
The pupils may have come across random variables in other programming languages such as Scratch to create a unpredictable actions. The video below demonstrates how to add random speeds, distances and directions to a Sphero.
Pupils can use random variables to experiment with plus they can also use the Randomize tick box when selecting a colour.
Programming random variables video tutorial
Extension Activities
As mentioned in the video above, there are lots of activity videos on the Lightning Lab app and website but the learning curve and most Primary age pupils may find it a bit daunting. One activity the pupils could try is my replicating some of the activities above in the text version of Lightning Lab which can be selected when a new program is started. The text section uses a language called Oval which is a version of C- Language You may want to explain to the pupils that operating systems such as Windows are written in C-language.
There is a guide to using Oval language here.
The code below is a text version of the square movement code from lesson 2. Notice the { } either end of the code. Also note that for the square there are 4 lots of the same 4 code lines with the only difference being the angle (controlSystemTargetYaw=) so the pupils could copy and paste to speed up the process.