Year 6 Web Design (teacher notes)
Pupil Activity Code: WH2R – What is it?
Progression of skills in this pack:
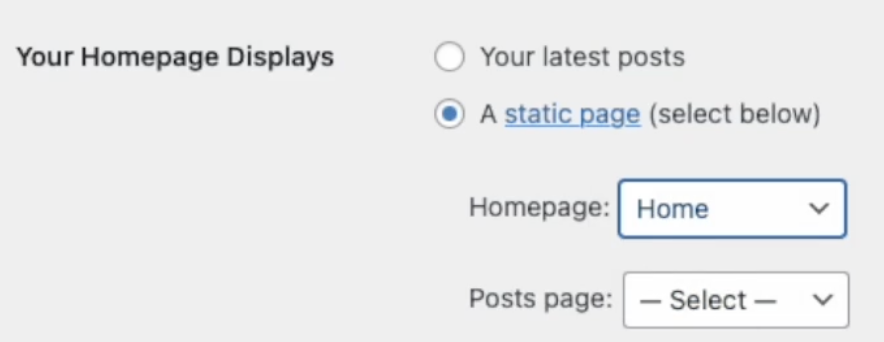
1. Create a static homepage.
2. Choose a suitable theme for your website.
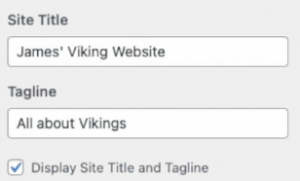
3. Change the site identity to a suitable title, tagline and website icon.
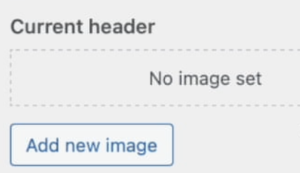
4. Upload a suitable header and/or background image.
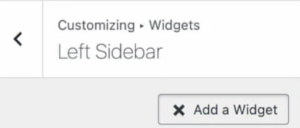
5. Adjust the website sidebar and add suitable widgets.
6. Add text and images to a page and edit them.
7. Add multiple pages and edit the navigation, including sub-menus.
8. Provide constructive feedback for your classmates’ websites.
National Curriculum Content
Select, use and combine a variety of software (including internet services) on a range of digital devices to design and create a range of programs, systems and content that accomplish given goals.
Prior Learning
The activities below cover many new skills but also revisit skills such as word processing so it is good idea pupils have covered the Year 3 Document Creation. As mentioned in the tutorials below, pupils should have researched the content for their website before creating it. For example, they could divide a topic into 5 or so categories which will make up the different pages of their website and have text in a word processor and images saved to their computer or device.
5-8 hours
Teacher information video for Edublogs
Introduction and setting up
The activities covered below allow pupils to understand how web services can be used to create fully functional websites. Our HTML Activity Pack covers how to create web-pages using code, whilst this activity pack uses Edublogs. Edublogs uses WordPress, which is traditionally a blogging platform but does account for 40% of websites. Edublogs allows teachers to create a teacher account then within the WordPress dashboard, create a username, password and web-link for each pupil to make their own websites using static pages instead of blog posts. These websites can be managed by the teacher ‘s dashboard. There is more info here about creating student blogs (websites) but we have also created a teacher information video above, covering the basic setup. You may to leave aside 20 minutes minimum for creating the accounts etc as each pupil will need a login.
Edublogs is free but there is a Pro plan. The free plan allows you add pupil logins and their websites but the amount of storage across all pupils is 1GB with each upload limited to 49mb so it is advisable that pupils do not add videos, hence we have not covered it below. The free plan also does not have all features, such as pupils cannot embed HTML code into their websites like Google maps. The free version also limits the amount of pages pupils can add in a short period time so it is a good idea for pupils to work on one page at a time.
✅ Assessment
As mentioned in the video above, the teacher login can be used to view and delete pupil websites. It can also be used to assess the pupil websites against the objectives above. Pupils can also provide constructive feedback on each others website.
Pupil Activity Pack – teacher view
The video tutorials from the pupil activity pack (find pupil code above) are below. You may want to watch the videos with your class together before the pupils try the different skills.
Introduction video
This video introduces the activity pack and web design using WordPress.
1. The WordPress dashboard
This video demonstrates how to sign into Edublogs and access the WordPress dashboard for your own website.
2. Create a static homepage
WordPress, by default, sets the homepage as blog posts but we want it to be a static page, such as a welcome page. Watch the video to learn how to add a page and make it the homepage.
3. Themes
Themes are the overall look of your website and we can choose from different designs. Watch the video to learn how to do this. Remember you can always go back and change the theme if you do not like it.
4. Site identity
This video demonstrates how you can change the identity of your site, including the title, tagline (short description) and icon (small picture in tab bar).
5. Header and background images
This video demonstrates how to upload a header (space at the top) or background image. You may want to only use one or the other, not both as they may clash.
6. Sidebars, widgets and mobile view.
This video demonstrates how to add and remove widgets (elements such as text and images etc) to and from the left and right sidebars (columns down the side of the website). You can remove all the widgets to remove the sidebars completely. The video also covers how your website can be viewed on different sized screens, such as mobile phones. Do this by going to ‘Appearance’ and choosing ‘Customize’ to bring up the menu.
7. Text and Images
This video demonstrates how to add text and images to your homepage and edit them.
Tip: Type your text into a word-processor such as Microsoft Word first, just in case you lose your web-page.
8. More pages and navigation
This video demonstrates how to add more pages and edit the navigation of your website, including creating sub-menus.
Tip: When you add a new page, create the content for it (text and images) before you add another page as you can only add one page in a short space of time.
9. Feedback
When you have finished your website, share the website URL (found in the dashboard when you first sign into Edublogs – see screenshot below) with a classmate, which they can type into their browser. Your teacher may have placed a password on your website but then you can provide feedback about their website and visa-versa. Try to provide 3 things you liked about their website and 1 thing they could improve.